Correcting/Repairing Images for Screen Printing

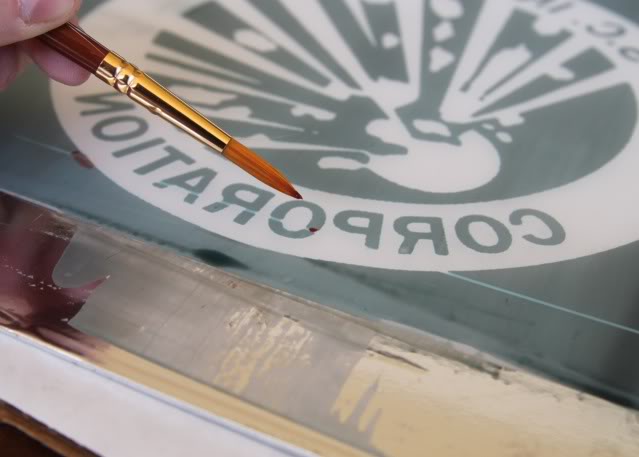
I tend to reuse my screens multiple times over for my prints and sometimes the images start to deteriorate as some of the photo emulsion starts to erode and wash off. There is a really simple solution to touch up these images: screen filler


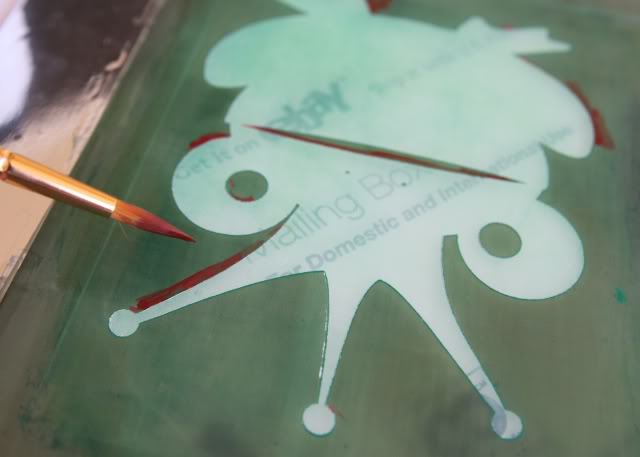
I use a small detailed paint brush to apply screen filler into the areas where the emulsion has started to disappear to clean up my image:


Another problem I run into: the glass I use to create my prints is slightly smaller than some of my larger screens so a small amount of light is diffused leaving a faint line in the final image:


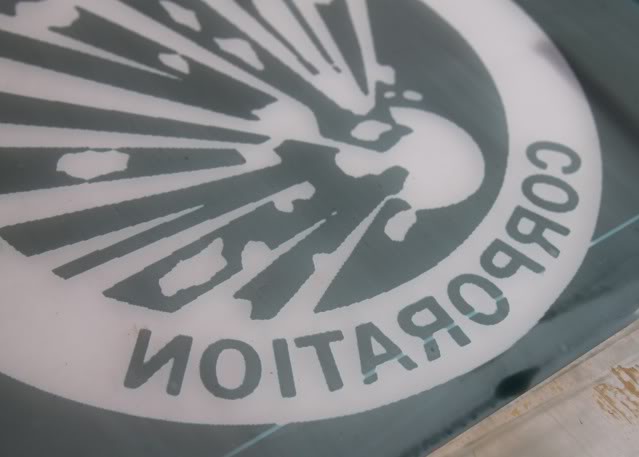
When this happens I just use screen filler to touch up the image:


You can also use screen filler to free hand a design onto a screen. You would apply it anywhere you don’t want ink to pass through. Happy printing!

Saturday LBB Gallery Share

Olivia of Olivia Hooper Photography updated photos of the halter dress pattern for my Etsy store. I love the dress she made and her baby girl is so precious. I love these photos….this one is my favorite:


And this one makes my heart melt:


This is the first halter dress Olivia made! Such a great job. She did the “fixed” straps in the back which I recommend for itty bitty ones……a halter really isn’t that practical if you are still crawling right? (Make sure to join the LBB Patterns Facebook page for more photos and sewing tips and to share what you’ve made!)


This photo shoot makes me miss our rocking chairs and back porch from when we lived on the east coast! I’m kind of thinking this white rocking chair is the perfect photo prop!

Marta of Haus of Girls sent me these photos of her little girl’s “princess and the frog” themed birthday party. She used the frog prince graphic to decorate the party favor bucket:


Frog prince vinyl cut outs to decorate the windows:


And frog prince cupcake toppers (made by Mel from the Larson Lingo):


And to top it all off the birthday girl is wearing a custom Lil Blue Boo frog prince dress! Happy birthday Sophie! You are the cutest thing ever and what a special mommy you have to put so much thought into your party!

I almost forgot this! Mr. Lil Blue Boo wanted to put a dress together….so I let him pick out all the fabrics and coordinate it. He might get a promotion now. I think it turned out pretty cute!

He chose a lime green shirt with a pocket for the back of the skirt which I thought was a cute touch!

Hope everyone is having a great Saturday! We spent the morning at a garage sale to benefit sweet Caitlyn and her family who had surgery last Thursday. Thank you all for your prayers! Her surgery went much better than expected which is truly a miracle.

Lil Blue Boo Lady Bugs!

Check out the adorable Izzy modeling my new Lil Blue Boo lady bug silk screens (and racer back style!) New one-of-a-kind upcycled knit dresses to start showing up daily in my Etsy shop using these ladybug and citrus prints until I run out (check the LBB Facebook page for listings)! Thank you Olivia for the breathtaking photos!


Click here for more info on Olivia Hooper Photography!

Last Year’s Mac Book

Note: if you are my parents or my in-laws….do NOT read this post ;)

I FINALLY finished it: Sienna’s book that we make every year for ourselves and her grandparents. This year I was waiting on the photos from my sister’s wedding so I just gave my parents and in-laws an IOU at Christmas….and then time got away from me…..but it is finished, bound and off to the printer. I added a few ideas from the 2008 book so I love this one even more than the last two…..here are some excerpted pages below. Maybe it will give spark some ideas (and I’m always welcoming new ideas for next year’s book!)

Note: All I used was the Mac iPhoto program. For example, each copy of the 65 page book ran me about $70 each. The quality is AMAZING and looks like an expensive coffee table book with the nice dust cover.

The cover: I love how vibrant and professional the Mac books turn out.

Little snippets of milestones: Many pages of these throughout….just thoughts I jotted down throughout the year that I wanted to remember.

A birthday photo: Some photos just deserve an entire page to themself.

Since I am a painter I just can’t get enough of photos of Boo painting…..

…..obviously.


More milestones:


Photo compilation: Sometimes a group of photos says much more than words.

I submitted Sienna’s artwork last year to What my Kid’s Art Says and used the hilarious reviews on the opposite pages of her scanned artwork.

The review:


The artwork:

The review:

The artwork:

Stories to accompany pages of photos:

Learning to swim:

Teaching to swim:

A summer activity:


Again, sometimes the photos say everything….she is my mini-me:

Just some cute athletic photos:


Scanned artwork:


Some firsts:


A favorite photo:

A classic shot of Diesel:

The November wedding:


I let Sienna have the camera one day and this was the result. Very artistic!


Christmas photos:

More scanned artwork:

New Year’s Eve!

Some excerpts from my last post about the Mac books:

If you don’t have a Mac you can download software products such as My Publisher or Kodak Gallery to make a similar photo book. There are so many different things you can do with these programs. Here are just a few ideas….please share more if you have them!

Child’s Art Portfolio: Scan all your children’s drawings and artwork. Add titles, dates and descriptions.

Family Recipe Book: Take pictures of all your favorite dishes and include the recipes.

Story Book: Let your child draw the pictures and dictate the story to you.

One year ago…..

…..I started this blog! One year ago (around February) I didn’t even know what a blog was! The only blogs I’d ever read or seen were political blogs during the election. A few friends (Mollie and Nikki) convinced me to start a blog to share the things I make with them….and it kind of took over my life. The first craft blog I ever visited was Homemade by Jill….my friend Jackie sent me the link. I was hooked. I can’t believe I’ve written over 350 posts in the last year…..where did the time go?

The name “Lil Blue Boo” I made up in about 30 seconds when Blogger asked me to fill in a name…..my daughter’s name is Boo, then I added the Li’l but left out the apostrophe to make it easy…..her favorite color is green but I didn’t like the name of Lil Green Boo. I thank God every day that I didn’t start with a name like Ashley’s Crafty Knick Knack Corner……that just wouldn’t have translated to all the different directions my blog has taken me!

Anyways, Happy Anniversary Lil Blue Boo! But most importantly: thank YOU. All of my followers and readers and visitors….THANK YOU THANK YOU! I wouldn’t be able to do what I love without you. You are all so supportive and friendly and I appreciate it more than you will ever know! So many of you link back to my site after doing a project and I love seeing everything you create. Thank you for sharing it with me. You motivate me everyday to wake up and create something new! I’m just a stay-at-home mom that likes to make stuff. I’ve always felt that if you follow your passion: you’ll be successful. If I can do it, anybody can. Just don’t put it off!

Lil Blue Boo in a year:
374 posts
60+ tutorials
5,165 subscribers/followers
389,000 visitors
6 clothing patterns
1,847 Etsy sales
1,450 Facebook fans
14 Sponsors

A few other BIG thank you’s:

Thank you Rachel, from One Pretty Thing, who sends more traffic my way than any other site! I love checking out her daily roundups to see what cool new ideas are out there. I went through around December and counted that she’d featured 27 of my tutorials/projects….then I stopped counting. I am indebted forever!

Thank you Anne over at Craft Gossip….for always linking my sewing projects (15 that I actually counted in December!) I truly appreciate the time and effort it takes to link up all of the projects you feature…..I know how much work it is.

And to all the other sites/blogs listed in my sidebar and all my sponsors….THANK YOU! I can’t wait to see what the next year brings!

Tonight (when I realized it had been one year) I started a blog/etsy makeover….I’ve obviously only gotten so far….so I’ll be working on it over the next week. Bear with me through the construction! It’s getting really late and I need some sleep! Till morning!


XOXO,

Ashley

Lil Blue Boo Citrus (and ZERO waste!)

I’ve been working on some spring silk screens for my clothing store. I put the question out there on Facebook and the overwhelming requests were citrus and ladybugs! So I did both. Here are some sneak peeks from a citrus photo shoot my friend Lisa and I did this morning at the park! Lady bug photo shoot to come soon! The “orange fairy” came just in time for some photo props too!


Here is how the dresses looked on the hanger:


Have I mentioned that EVERY little last scrap of t-shirts and knits gets upcycled?! Lil Blue Boo is trying to go to ZERO waste. Pieces that are too small for dress sleeves I send to my friend Shari for use in her adorable Soren Lorensen Design creations. Pieces that are too small for her? Those go to my friend Lisa of Ellebows and More for her new line of upcycled hair pieces to match my Lil Blue Boo dresses! They are so cute I can’t stand it….she leaves pieces of the seams, stitching etc. Each one is limited and unique! She’ll be adding more mis-matched pieces as she gets dress scraps…..so if you are looking for pieces to match your dresses there will probably be a delay before they show up in her shop. OR send her photos of your LBB dresses and see if she has some coordinating scraps to match a few of them! More products to come as well!


There have been a few recent improvements to LBB dresses too…..a more refined neckline and a hidden seam at the neck for those kiddos that might have sensory issues like my little one!

Tie Dyeing a Peace Sign (A Tutorial)

Since peace signs are back I wanted to come up with an easy way to tie dye one. I like how the result was a starburst effect.


I’ve been brainstorming for a week or so with this napkin in my car on how I wanted to do it….folding and refolding the peace sign while sitting at stoplights:


So here’s what I came up with…..peace sign tie dyeing….origami-style:

Step 1: Take your shirt or fabric and fold it in half and mark the center of the shirt with a disappearing ink pen:


Open the shirt up and draw a large circle around the center line to estimate how large you want the peace sign to be (it doesn’t have to be perfect):


Starting at the center of the circle draw the two legs to your peace sign (again, these don’t have to be perfect….they will just be guide lines):


Step 2: Once you are happy with the size and placement of your peace sign…..


….refold your t-shirt in half.


Take the bottom front center of the tee and fold it up to meet the “leg” of the peace sign:


Next take the center of the neck and fold it down to the “leg” as well so that the two edges meet:


Step 3: Pinch where the edges meet and pull the shirt upward…….


………so that the shirt folds in half:


Use clothes pins or large safety pins to hold the edges where your two legs and center line of the peace sign meet:


Step 4: Starting gathering at one edge of the line indicating the outer circle of the peace sign……


…..and gather all the way across to the other side……


……and secure it with a rubber band (as you add more rubber bands make a mental note of THIS band so that you know which one to dye):


Step 5: Add on other rubber bands along the shirt (if using clothes pins it is easier to remove them, add on your rubber band, restraighten all the edges and then reattached the pins)……


…..just make sure to restraighten your three edges as you go:


Here is what your shirt will look like at this point:


Step 6: Soak the entire shirt in soda ash/water mixture until damp and squeeze out the excess liquid (see my tutorial on using Procion dye for specifics on the soda ash and mixing your dye):


Step 7: To prevent too much bleeding with your design set up a small rack (like the kind used for cabinet shelving or locker storage) over a tub or bucket:


Step 8: Apply a generous amount of dye along the three edges secured by the clothes pins (which are the “legs” and center of your peace sign)…..


…..and to the rubber band marking the outer circle of your peace sign:


In this example, I’ve dyed the outer circle and legs of the peace sign Kelly Green:

Step 9: Using contrasting dye colors fill in the other areas of the shirt:


Step 10: Place the shirt in a plastic bag and leave overnight for the colors to set!


Step 11: The next day remove the fabric from the bag and while still tied rinse off the excess dye using cold running water and then run through your washing machine. Dharma recommends the final wash with HOT water and Synthrapol or something similar so that the garment will never bleed on anything.

My Favorite Friday Night Meal

When Mr. Lil Blue Boo and I first got married we had a tradition of putting out a huge spread on the coffee table for our Friday night dinner. We would watch a rented movie and snack. Our typical spread was fresh cut fruits and veggies, dips, chips and salsa, cheese and crackers, crusty rosemary bread and sushi. With a toddler running around it didn’t work that well for a while but I’ve started to slowly re-introduce it with mini versions:


Have a great Friday night!

My Work Space (Updated Photos!)

I always love seeing where people work. It always gives a little more insight into their personality I think. After a little organization I took some updated photos of where I work everyday. Below is my smaller studio where I do small sewing projects and painting. All my non-knit fabric is stored on one side of the studio with my sewing machine. My large easel has a painting that will probably never be finished!


This side of my smaller studio is where I paint smaller paintings. You can see some close up photos in the last post I did on my studio.


Order or chaos? Who knows…..


Journals, mixed media books, gel mediums and solvents:


Finished paintings I just don’t know what to do with yet:


My second studio is a casita (guest house) outside but while Boo is young I’ve moved into our dining room so I can work and play with her at the same time. As you walk in our house, you see through a niche cutout (past the golf weather vane I took from my childhood home), my larger sewing studio/dining room:


Here is where I sew Lil Blue Boo dresses. From my chair I can see up into the living room and keep tabs on Boo!


A large rack of yummy finished dresses:


I have a dining room table and a conference room table I borrowed from my husband’s office. One is the sewing/cutting table…..the other is a shipping area. I can’t wait to reclaim my dining room at the end of this summer!


A big box of thread:


Bins of scrap knits too small to fold (every once in a while I sort them by color….but it doesn’t last long):


Our butler’s pantry is stocked with knits and wine……unlikely combo, right?!


Reclaimed knit waiting to be picked:


Stacks of new and thrifted tees as well as knit yardage:

And here is what is all looks like after a day of work:


Right now the casita is a storage room for canvases, fabric, baby stuff to sort through…..and paintings that will never have a place like this one:


I have a lot of work to do next fall cleaning out for my move! There’s my tour! Any insights?

A Dress for Caitlyn

I made this dress this morning to auction for our friend’s 11-year-old daughter Caitlyn. Today her MRI showed a large cyst taking over the left side of her brain. She is scheduled to undergo extensive open brain surgery this next Thursday. Please pray for Caitlyn and her family.

The dress is one-of-a-kind (very similar to the one I made Boo last week) and for a precious cause….please go check it out:


You can read more about Caitlyn and her family at the We Love Caitlyn blog:

Please tweet, blog or FB to help me spread the word about this auction and to rally prayers! Thank you!

Related Posts Plugin for WordPress, Blogger...