 via lilblueboo.com")
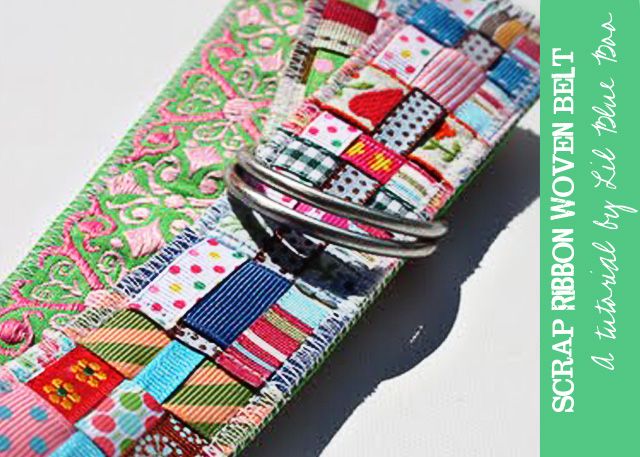
I have so many ribbon scraps that are under 2″ and I’ve contemplated throwing them out many times. This is what I came up with to use them all up….a ribbon belt. But you could use this technique for tons of other things….a headband, a purse strap, a drink coaster…..I had to narrow it down eventually!
Update: Project time is about 2 hours. Sewing the belt in small increments actually makes it go faster than you think…..
 2 via lilblueboo.com")
The belt pictured is reversible to the pink and green jacquard backing.
 3 via lilblueboo.com")
I used every ribbon combination imaginable. The more colors, the more interesting. Making the belt I worked in small 6 inch sections and tried to limit the repeat of ribbon throughout.
Grab your scraps and let’s get started!
 ribbon combination via lilblueboo.com")
Before starting you’ll need the following materials:
:: Ribbon Scraps
:: 1.5″ cotton webbing
:: Dritz Fray Check or thread glue
:: 1.5″ D Rings
:: Coordinating thread
Tools needed: sewing machine and scissors
:: 1.5″ cotton webbing
:: Dritz Fray Check or thread glue
:: 1.5″ D Rings
:: Coordinating thread
Tools needed: sewing machine and scissors
Before starting you’ll also have to measure your waist or hip area….(where you like for your belt to sit) and add 8″ to that measurement.
Step 1: Cut your cotton webbing for your belt length based on the measurement above.
 step 1 via lilblueboo.com")
Step 2: Take scrap pieces of ribbon and line up next to each other on your cotton webbing. You can pin the ribbon……
 step 2 via lilblueboo.com")
…..but it is easiest just to put each ribbon on one at a time as you sew down the side of the cotton webbing (about 1/8″ from the edge of the belt). Just make sure to leave your needle down when you lift the foot up to place the next ribbon. Stop once you get 6 or 7 inches of ribbons added (I refer to these as your “short” ribbons). This 6 to 7 inch length is about all that is manageable to weave at one time.
 step 3 via lilblueboo.com")
Step 3: Place 2 to 3 ribbons perpendicular to the ribbons you just sewed on (I refer to these as your “long” ribbons). Sew these ribbons onto the cotton webbing.
 step 4 via lilblueboo.com")
Step 4: Weave the long ribbons over and under the short ribbons.
 step 5 via lilblueboo.com")
Step 4: Making sure all the ribbons fit tightly together, sew the other end of the long ribbon pieces to secure them to the belt.
 step 6 via lilblueboo.com")
Step 5: Carefully sew the short ribbons securely to the belt (about 1/8″ from the edge of the belt).
 step 7 via lilblueboo.com")
Step 6: Trim your shorter ribbons on each side so that they are flush with the cotton webbing….
 step 8 via lilblueboo.com")
…..and trim your longer ribbons leaving about 1/4″.
 step 9 via lilblueboo.com")
Step 7: Repeat all of the previous steps starting with laying a piece of short ribbon over the 1/4″ ends that were just trimmed. Continue until you have another 6 to 7 inch length of short ribbons sewn on to the belt.
 step 10 via lilblueboo.com")
Step 8: Add your 2 to 3 longer ribbons by sewing directly over the stitch that secured the previous long ribbons. Then trim these ends to about 1/8″.
 step 11 via lilblueboo.com")
Note: In between steps you might want to add Fray Check to your ribbon edges if they start to unravel.
 step 12 via lilblueboo.com")
My assistant was a huge help in picking out each sequence of ribbons.
 step 13 via lilblueboo.com")
Step 9: Use a zigzag stitch to sew all the edges of the belt.
Optional: I cut a long piece of ribbon jacquard (1″ shorter than my belt length to leave room for the D rings) to sew onto the back of the belt for decoration and attached it with the zigzag stitch.
 step 14 via lilblueboo.com")
Step 10: Place your D rings on one end of the belt…..
 step 15 via lilblueboo.com")
……and fold your belt end back, and sew the fold closed. You may have to use a zipper foot here if your D rings get in the way (I had enough room and was able to use the regular foot).
 step 16 via lilblueboo.com")
Step 11: Trim any frayed edges or threads and add thread glue or Fray check where needed.
 step finished via lilblueboo.com")
You never cease to amaze me!!! Awesome idea! I'll start saving those tiny ribbon scraps!
Pure genius. Love it!
Oh wow. That must have taken forever! Great work!
Wow! that is cute! I dont think I would ever have the patience for it though and my kids wont wear belts 🙁 Great Job!
wow! my collection of tiny scraps of ribbon is getting CLOSE to as ridiculous as my collection of tiny scraps of fabric. finally something i can use them for!! thanks!
You are so cool! I LOVE all your ideas – you so creative and I'm so jealous!! Of course I LOVE this belt too!!
very cool ash!
I think I'll make one for my little girl. I have tons of ribbon scraps that I can't bring myself to throw away. I will try one of these as soon as school starts back.
I love it! Once my belly gets small enough for a belt again I think this would spice up an outfit. Thanks for the great idea.
Wow-this is gorgeous! I want to go make one right this second! Thanks so much, I just love your ideas! I'll be linking.
That is the cutest thing! Watch out Martha! Wow.
This is so cute! It's really impressive that Sienna is doing the zig zaggin. That is a first grade skill and even they have a hard time with it! Good work.
Wow! I love it, too. I think this is what my little sister is getting for Christmas!!!!
What a great use of leftover ribbon remnants! SO cute
I knew I'd eventually find a project for all of my little ribbon scraps! Thanks for the idea and tutorial! Congrats on making the Daily DIY!
LOVE it!!!!! Adorable !
WOW! I'm gasped you've done it again. it's beautiful and inspairing
That is the CUTEST thing ever! I HAVE to make this! thanks for the inspiration!
I love this! I have tons of ribbon scraps too…I'll have to try to make this belt! Thanks for the tutorial!
wow this is brilliant!!!! thanks so much for this tutorial! i saved it for future use! 🙂
Fantastic upcycling idea! Yeah, it's annoying to save seemingly useless scraps, but it's also kind of sad to just toss out such pretty (or sentimental) little things…great solution!
oh how i wish i could sew. do you have any idea how much ribbon i have, i'd love to make this :O) its so cute, i love it!!
I'm getting a little sinking feeling in my tummy because now that I've seen this belt, I won't ever be able to throw away a little scrap of ribbon!!
I posted a link to your tutorial on Craft Gossip Sewing:
http://sewing.craftgossip.com/tutorial-woven-ribbon-scrap-belt/2009/08/19/
–Anne
What a great idea and tutorial! My cousin has four daughters, so I'm always looking for cute, girly, inexpensive gifts to make for them. This might just work for Christmas!
LOVE this. LOVE!!!
omgosh! i love love love this! what a fantastic idea. i think this is something my 10 year old daughter would LOVE to do with me!!
I just made this and it came out great. Thanks so much for the great tutorial, it was very easy to follow.
This is super cute and a GREAT idea!!! I've been holding onto ribbon scraps for a long time trying to figure out what to do with them! I can't wait to do this… and to make headbands and belts and purse straps! GREAT ideas! THANK YOU!
P.S. Burning the edges of the ribbons guaruntees no fraying. 🙂
Tried it and LOVE it! Thank you so much for sharing this tutorial! I've linked up my attempt. Can't wait to give it to my little girl! 🙂
I loved this technique so much, that I tried making a couple coasters with ribbon! Thanks for the idea!!
http://fallanstechnicolordreams.blogspot.com/2011/02/ribbon-coasters.html
Want to leave a comment on my way from Denmark, crossing you blogg.
That belt is fantastic. I will make one or two for my self as soon as possible.
Have a nice weekend
I featured this on my blog today!
http://www.kimboscrafts.blogspot.com
Hey Ashley! I hope you are feeling better. I pray for you everyday. I feel like I know you. I have had similar ups and downs so you wiegh heavy in my heart.
I have a question about this belt. I can’t find 1.5″ webbing anywhere can you give me any ideas? I have gone to the craft stores and looked online? I think 1″ will be too narrow.